Attack on Pearl Harbour
2008/9 Schools Wikipedia Selection. Related subjects: World War II
|
||||||||||||||||||||||||||||||
|
||||||||||||||||||||||||||||||
|
||||||||||||||||||||||||||||||
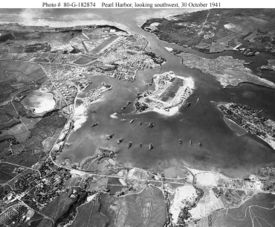
The attack on Pearl Harbour or Hawaii Operation as it was called by the Imperial General Headquarters, was a surprise attack against the United States' naval base at Pearl Harbour, Hawaii by the Japanese navy, on the morning of Sunday, December 7, 1941, resulting in the United States becoming involved in World War II. It was intended as a preventive action to remove the U.S. Pacific Fleet as a factor in the war Japan was about to wage against Britain, the Netherlands, and the United States. Two aerial attack waves, totaling 353 aircraft, launched from six Japanese aircraft carriers.
The attack wrecked two U.S. Navy battleships, one minelayer, and two destroyers beyond repair, and destroyed 188 aircraft; personnel losses were 2,388 killed and 1,178 wounded. Damaged warships included three cruisers, a destroyer, and six battleships (one deliberately grounded, later refloated and repaired; two sunk at their berths, later raised, repaired, and eventually restored to Fleet service). Vital fuel storage, shipyard, maintenance, and headquarters facilities were not hit. Japanese losses were minimal, at 29 aircraft and five midget submarines, with 65 servicemen killed or wounded.
The aim of the strike was to protect Imperial Japan's advance into Malaya and the Dutch East Indies — for their natural resources such as oil and rubber — by neutralizing the U.S. Pacific Fleet. Both the U.S. and Japan had long-standing contingency plans for war in the Pacific, continuously updated as tension between the two countries steadily increased during the 1930s. Japan's expansion into Manchuria and French Indochina were greeted with steadily increasing levels of embargoes and sanctions by the United States and others. In 1940, under the Export Control Act, the U.S. halted shipments of airplanes, parts, machine tools, and aviation gasoline, which Japan saw as an unfriendly act. Nevertheless, the U.S. continued to export oil to Japan, in part because it was understood in Washington cutting off oil exports would be an extreme step, given Japanese dependence on U.S. oil exports, likely to be taken as a provocation by Japan. In the summer of 1941, after Japanese expansion into French Indochina, the U.S. ceased oil exports to Japan, in part because of new American restrictions on domestic oil consumption. President Franklin D. Roosevelt had earlier moved the Pacific Fleet to Hawaii and ordered a buildup in the Philippines, hoping to deter Japanese aggression in the Far East. The Japanese high command was certain, though mistakenly so, an attack on the United Kingdom's colonies would bring the U.S. into the war, so a preventive strike appeared to be the only way Japan could avoid U.S. interference in the Pacific. While the attack accomplished its intended objective, it was completely unnecessary--unbeknownst to Isoroku Yamamoto, who conceived the original plan, the U.S. Navy had decided to abandon any intention of 'charging' across the Pacific towards the Philippines at the outset of war back in 1935 (in keeping with the evolution of War Plan Orange). They instead adopted "Plan Dog" in 1940, which emphasized keeping the Imperial Japanese Navy (IJN) out of the eastern Pacific and the shipping lanes to Australia, while the U.S. concentrated on defeating Nazi Germany.
The attack was one of the most important engagements of World War II. Occurring as it did before a formal declaration of war, it pushed U.S. public opinion from isolationism to an acceptance war was unavoidable, as Roosevelt called December 7, 1941 "... a date which will live in infamy."
Background to conflict
War between Japan and the United States had been a possibility each nation had been aware of (and developed contingency plans for) since the 1920s, though tension did not begin to grow serious until Japan's 1931 invasion of Manchuria. Over the next decade, Japan continued to expand into China leading to all out war between the two in 1937. In 1940, Japan invaded French Indochina, partly in an effort to control supplies reaching China, and partly as a first step to improve her access to resources in Southeast Asia. This move prompted an American embargo on oil exports to Japan, which in turn caused the Japanese to decide to commence the planned takeover of oil supplies in the Dutch East Indies.
Preliminary planning for an attack at Pearl Harbour, to protect this move into the "Southern Resource Area" (the Japanese term for the East Indies and Southeast Asia generally), had begun in very early 1941, under the auspices of Admiral Isoroku Yamamoto, then commanding Japan's Combined Fleet. He won assent to formal planning and training for an attack from the Imperial Japanese Navy General Staff only after much contention with Naval Headquarters, including a threat to resign his command. Full-scale planning was underway by early spring 1941, primarily by Captain Minoru Genda. Over the next several months, pilots trained, equipment was adapted, and intelligence gathered. Despite these preparations, the actual approval of the attack plan was not issued by Emperor Shōwa until 5 November, after the third of four Imperial Conferences which considered the matter. Final authorization to attack was not given by him until December 1, after a majority of Japanese leaders had advised him that the " Hull Note" would "destroy the fruits of the China incident, endangered Manchukuo and undermined control of Korea." Hostilities between the U.S. and Japan were expected by many observers, including President Roosevelt, who read a decrypted Japanese message and told his assistant Harry Hopkins, "This means war."
Approach and attack
At 03:42 Hawaiian Time, hours before commanding Admiral Chuichi Nagumo began launching strike aircraft, the minesweeper USS Condor spotted a midget submarine outside the harbour entrance and alerted destroyer USS Ward. Ward was initially unsuccessful in locating the target. Hours later, Ward fired America's first shots in the Pacific theatre of WWII when she attacked and sank a midget submarine, perhaps the same one, at 06:37.
Five midget submarines had been assigned to torpedo U.S. ships after the bombing started. None of these returned, and only four have since been found. Of the ten sailors aboard, nine died; the only survivor, Kazuo Sakamaki, was captured, becoming the first Japanese prisoner of war. United States Naval Institute analysis of photographs from the attack, conducted in 1999, indicates one of these mini-subs entered the harbour and successfully fired a torpedo into the USS West Virginia, what may have been the first shot by the attacking Japanese. Her final disposition is unknown.
Tactical concept
405 aircraft were to be used in the attacks. 360 were used for the two waves of attack and 48 served defensive combat air patrols (CAP), including nine fighters from the first wave.
The first wave was to be the primary attack, while the second wave was to complete whatever remained unfinished. The first wave contained the bulk of the armament needed to attack capital ships, using mostly torpedoes. The airmen were ordered to attack the highest value targets (battleships and aircraft carriers), and if either were not present, any other high value ships (cruisers and destroyers). Dive bombers were to attack ground targets. Fighters were ordered to strafe and destroy as many parked aircraft as possible to ensure they did not get into the air to counterattack the bombers, especially in the first wave. When the fighters' fuel got low, they were to refuel at the aircraft carriers and return to combat. Fighters were to serve CAP duties where needed, especially over US airfields.
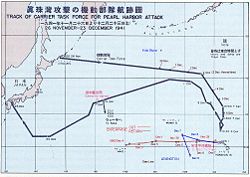
Before the attack, two reconnaissance aircraft launched from cruisers were sent to scout over Oahu and report on enemy fleet composition and location. Another four scouts, launched from cruisers and battleships, patrolled the area between the fleet and Niihau, in order to prevent the Kido Butai from being surprised by U.S. forces.
First wave
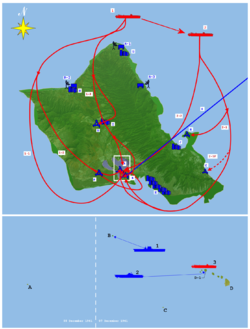
Top:
A. Ford Island NAS B. Hickam Field C. Bellows Field D. Wheeler Field
E. Kaneohe NAS F. Ewa MCAS R-1. Opana Radar Station R-2. Kawailoa RS R-3. Kaaawa RS
G. Haleiwa H. Kahuku I. Wahiawa J. Kaneohe K. Honolulu
0. B-17s from mainland 1. First strike group 1-1. Level bombers 1-2. Torpedo bombers 1-3. Dive bombers 2. Second strike group 2-1. Level bombers 2-1F. Fighters 2-2. Dive bombers
Bottom:
A. Wake Island B. Midway Islands C. Johnston Island D. Hawaii
D-1. Oʻahu1. USS Lexington 2. USS Enterprise 3. First Air Fleet
The first attack wave of 183 planes launched north of Oʻahu, commanded by Captain Mitsuo Fuchida. Six planes didn't launch because of technical difficulties It included:
- 1st Group (targets: battleships and aircraft carriers)
- 50 Nakajima B5Ns armed with 800 kg (1760 lb) armor piercing bombs, in four sections.
- 40 B5Ns armed with Type 91 torpedoes, also in four sections.
- 2nd Group — (targets: Ford Island and Wheeler Field)
- 54 Aichi D3As armed with 550 lb (249 kg) general purpose bombs
- 3rd Group — (targets: aircraft at Ford Island, Hickam Field, Wheeler Field, Barber’s Point, Kaneohe)
- 45 Mitsubishi A6Ms for air control and strafing
As the first wave approached Oʻahu, an Army SCR-270 radar at Opana Point, near the island's northern tip (a post not yet operational, having been in training mode for months), detected them and called in a warning. Although the operators reported a target echo larger than anything they had ever seen, an untrained officer at the new and only partially activated Intercept Centre, Lieutenant Kermit A. Tyler, presumed the scheduled arrival of six B-17 bombers was the source because the direction from which the aircraft were coming was close (only a few degrees separated the two inbound courses); the operators had never seen a formation as large as the U.S. bombers' on radar; and possibly because the operators had only seen the lead element of incoming attack.
Several U.S. aircraft were shot down as the first wave approached land; one at least radioed a somewhat incoherent warning. Other warnings from ships off the harbour entrance were still being processed, or awaiting confirmation, when the planes began bombing and strafing. Nevertheless, it is not clear any warnings would have had much effect even if they had been interpreted correctly and much more promptly. For instance, the results the Japanese achieved in the Philippines were essentially the same as at Pearl Harbour, though MacArthur had almost nine hours warning the Japanese had already attacked at Pearl, and specific orders to commence operations, before they actually struck his command.
The air portion of the attack on Pearl Harbour began at 7:48 a.m. Hawaiian Time (3:18 a.m. December 8 Japanese Standard Time, as kept by ships of the Kido Butai), with the attack on Kaneohe. A total of 353 Japanese planes in two waves reached Oʻahu. Slow, vulnerable torpedo bombers led the first wave, exploiting the first moments of surprise to attack the most important ships present (the battleships), while dive bombers attacked U.S. air bases across Oʻahu, starting with Hickam Field, the largest, and Wheeler Field, the main U.S. Army Air Corps fighter base. The 171 planes in the second wave attacked the Air Corps' Bellows Field near Kaneohe on the windward side of the island, and Ford Island. The only air opposition came from a handful of P-36 Hawks and P-40 Warhawks.
Men aboard U.S. ships awoke to the sounds of alarms, bombs exploding, and gunfire prompting bleary eyed men into dressing as they ran to General Quarters stations. (The famous message, "Air raid Pearl Harbour. This is not drill.", was sent from the headquarters of Patrol Wing Two, the first senior Hawaiian command to respond.) The defenders were very unprepared. Ammunition lockers were locked, aircraft parked wingtip to wingtip in the open to deter sabotage, guns unmanned (none of the Navy's 5"/38 AA and only a quarter of its machine guns, and only four of 31 Army batteries got in action). Despite this and low alert status, many American military personnel responded effectively during the battle. Ensign Joe Taussig got his ship, USS Nevada, underway from dead cold during the attack. One of the destroyers, USS Aylwin, got underway with only four officers aboard, all Ensigns, none with more than a year's sea duty; she operated at sea for four days before her commanding officer managed to get aboard. Captain Mervyn Bennion, commanding USS West Virginia (Kimmel's flagship), led his men until he was cut down by fragments from a bomb hit to USS Tennessee, moored alongside.
Gallantry was widespread. In all, 14 officers and sailors were awarded the Medal of Honour. A special military award, the Pearl Harbour Commemorative Medal, was later authorized for all military veterans of the attack.
Second wave composition
The second wave consisted of 171 planes: 54 B5Ns, 81 D3As, and 36 A6Ms, commanded by Lieutenant-Commander Shigekazu Shimazaki. Four planes didn't launch because of technical difficulties. This wave and its targets comprised:
- 1st Group — 54 B5Ns armed with 550 lb (249 kg) and 120 lb (54 kg) general purpose bombs
- 27 B5Ns — aircraft and hangars on Kaneohe, Ford Island, and Barbers Point
- 27 B5N — hangars and aircraft on Hickam Field
- 2nd Group (targets: aircraft carriers and cruisers)
- 81 D3As armed with 550 lb (249 kg) general purpose bombs, in four sections
- 3rd Group — (targets: aircraft at Ford Island, Hickham Field, Wheeler Field, Barber’s Point, Kaneohe)
- 36 A6Ms for defense and strafing
The second wave was divided into three groups. One was tasked to attack Kāneʻohe, the rest Pearl Harbour proper. The separate sections arrived at the attack point almost simultaneously, from several directions.
Ninety minutes after it began, the attack was over. 2,386 Americans died (55 were civilians, most killed by unexploded American anti-aircraft shells landing in civilian areas), a further 1,139 wounded. Eighteen ships were sunk, including five battleships.
Of the American fatalities, nearly half of the total were due to the explosion of USS Arizona's forward magazine after it was hit by a modified 40 cm (16in) shell.
Already damaged by a torpedo and on fire forward, Nevada attempted to exit the harbor. She was targeted by many Japanese bombers as she got under way, sustaining more hits from 250 lb (113 kg) bombs as she was deliberately beached to avoid blocking the harbour entrance.
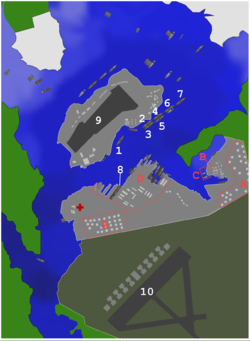
USS California was hit by two bombs and two torpedoes. The crew might have kept her afloat, but were ordered to abandon ship just as they were raising power for the pumps. Burning oil from Arizona and West Virginia drifted down on her, and probably made the situation look worse than it was. The disarmed target ship USS Utah was holed twice by torpedoes. USS West Virginia was hit by seven torpedoes, the seventh tearing away her rudder. USS Oklahoma was hit by four torpedoes, the last two above her belt armor, which caused her to capsize. USS Maryland was hit by two of the converted 40 cm shells, but neither caused serious damage.
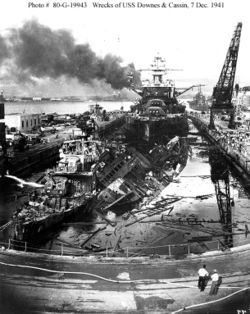
Although the Japanese concentrated on battleships (the largest vessels present), they did not ignore other targets. The light cruiser USS Helena was torpedoed, and the concussion from the blast capsized the neighboring minelayer USS Oglala. Two destroyers in dry dock were destroyed when bombs penetrated their fuel bunkers. The leaking fuel caught fire; flooding the dry dock in an effort to fight fire made the burning oil rise, and so the ships were burned out. The light cruiser USS Raleigh was holed by a torpedo. The light cruiser USS Honolulu was damaged but remained in service. The destroyer USS Cassin capsized, and destroyer USS Downes was heavily damaged. The repair vessel USS Vestal, moored alongside Arizona, was heavily damaged and beached. The seaplane tender USS Curtiss was also damaged. USS Shaw was badly damaged when two bombs penetrated her forward magazine.
Of the 402 American aircraft in Hawaii, 188 were destroyed and 159 damaged, 155 of them on the ground. Almost none were actually ready to take off to defend the base. Of 33 PBYs in Hawaii, 24 were destroyed, and six others damaged beyond repair. (The three on patrol returned undamaged.) Friendly fire brought down several U.S. planes on top of that, including some from an inbound flight from USS Enterprise. Japanese attacks on barracks killed additional personnel.
Fifty-five Japanese airmen and nine submariners were killed in the action. Of Japan's 414 available planes, 29 were lost during the battle (nine in the first attack wave, 20 in the second), with another 74 damaged by antiaircraft fire from the ground.
Possible third wave
Several Japanese junior officers, including Fuchida and the chief architect of the attack, Captain Minoru Genda, urged Nagumo to carry out a third strike in order to destroy as much of Pearl Harbour's fuel storage, maintenance, and dry dock facilities as possible. Some military historians have suggested the destruction of these oil tanks and repair facilities would have crippled the U.S. Pacific Fleet far more seriously than loss of its battleships. If they had been wiped out, "serious [American] operations in the Pacific would have been postponed for more than a year." Nagumo, however, decided to forgo a third attack in favour of withdrawal for several reasons:
- American anti-aircraft performance had improved considerably during the second strike, and two-thirds of Japan's losses were incurred during the second wave. Nagumo felt if he launched a third strike, he would be risking three-quarters of the Combined Fleet's strength to wipe out the remaining targets (which included the facilities) while suffering higher aircraft losses.
- The location of the American carriers remained unknown. In addition, the Admiral was concerned his force was now within range of American land-based bombers. Nagumo was uncertain whether the U.S. had enough surviving planes remaining on Hawaii to launch an attack against Japan's carriers.
- A third wave attack would have required substantial preparation and turn-around time, and would have meant returning planes would have faced night landings. At the time, no Navy had developed night carrier techniques, so this was a substantial risk.
- The task force's fuel situation did not permit him to remain in waters north of Pearl Harbour much longer since he was at the very limits of logistical support. To do so risked running unacceptably low on fuel, perhaps even having to abandon destroyers en route home.
- He believed the second strike had essentially satisfied the main objective of his mission — the neutralization of the Pacific Fleet — and did not wish to risk further losses.
At a conference aboard Yamato the following morning, Yamamoto initially supported Nagumo's decision to withdraw. In retrospect, however, Nagumo's decision to spare the vital dockyards, maintenance shops, and oil depots meant the U.S. could respond relatively quickly to Japanese activities in the Pacific. Yamamoto later regretted Nagumo's decision and categorically stated it had been a great mistake not to order a third strike.
Aftermath
Though the attack was notable for its large-scale destruction, the damage was not significant in terms of American fuel storage, maintenance and intelligence capabilities. Had Japan destroyed the American carriers, the U.S. would have sustained significant damage to the Pacific Fleet's ability to conduct offensive operations for a year or so (given no diversions from the Atlantic Fleet). As it was, the elimination of the battleships left the U.S. Navy with no choice but to place its faith in aircraft carriers and submarines — the very weapons with which the U.S. Navy halted and eventually reversed the Japanese advance. A major flaw of Japanese strategic thinking was a belief the ultimate Pacific battle would be between battleships of both sides, in keeping with the doctrine of Captain Alfred Mahan. As a result, Yamamoto (and his successors) hoarded battleships for a "decisive battle" that never happened.
Ultimately, targets not on Genda's list, such as the Submarine Base and the old Headquarters Building, proved more important than any battleship. It was submarines that immobilized the Imperial Japanese Navy's heavy ships and brought Japan's economy to a standstill by crippling transportation of oil and raw materials. And in the basement of the old Administration Building was the cryptanalytic unit, HYPO, which contributed significantly to the Midway ambush and the Submarine Force's success.
Salvage
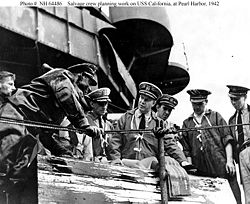
After a systematic search for survivors, formal salvage operations began. Captain Homer N. Wallin, Material Officer for Commander, Battle Force, U.S. Pacific Fleet, had recently been given orders to Massawa and was awaiting transportation when the Japanese attack came. In Massawa, he was to have assisted the British in clearing scuttled Italian and German ships from that harbor. Instead, Wallin was immediately retained for salvage leadership in Pearl Harbour; Commander Edward Ellsberg was ordered to Massawa as his replacement, a switch that delayed by several months British hopes for a useful port in the Red Sea.
Around Pearl Harbour, divers from the Navy (shore and tenders), the Naval Shipyard, and civilian contractors (Pacific Bridge, and others) began work on the ships which could be refloated. They patched holes, cleared debris, and pumped water out of ships. Navy divers worked inside the damaged ships. Within six months, five battleships and two cruisers were patched or refloated so they could be sent to shipyards in Pearl and on the mainland for extensive repair.
Intensive salvage operations continued for another year. The Utah and Arizona were too heavily damaged for salvage, though much of their armament and equipment was removed and restored for use aboard other vessels. Today, the two hulls remain where they were sunk.
Divers logged in 20,000 hours under water with zero visibility. They worked in water with heavy oil, dangerous debris, decomposing bodies, and unexploded ordnance.
Subsequent attack on Pearl Harbour
On March 4, 1942, two Kawanishi H8K "Emily" flying boats bombed Pearl Harbour after fueling at French Frigate Shoals. Due to poor visibility, the bombs were off target and did not accomplish any significant damage. The resulting power outage delayed salvage operations temporarily.

